
USB Digital Microscope B10 Driver
Driver for Cainda USB Digital Microscope B10
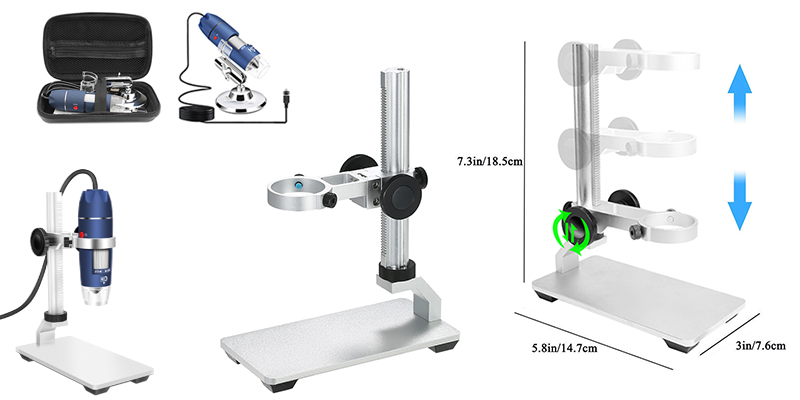
If you want to get a metal stand for your B10 microscope, please click cainda-gift@outlook.com to send an email to us.
Attach the title "I want a metal stand" and your Amazon order# in the email.
Quick Access For Driver and Operation
Windows
Mac
Chrome OS
Linux
Android
Use in Windows
Cainda USB Microscope will automatically install default webcam (UVC) drivers when plugged into a host device. So it's compatible with any webcam app, you can choose one or more softwares below to install on your PC according to your need.
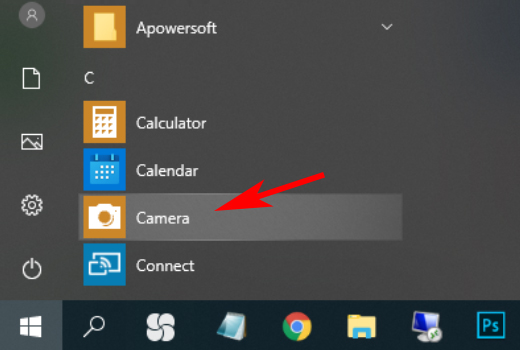
1) Win10 Built-in Software
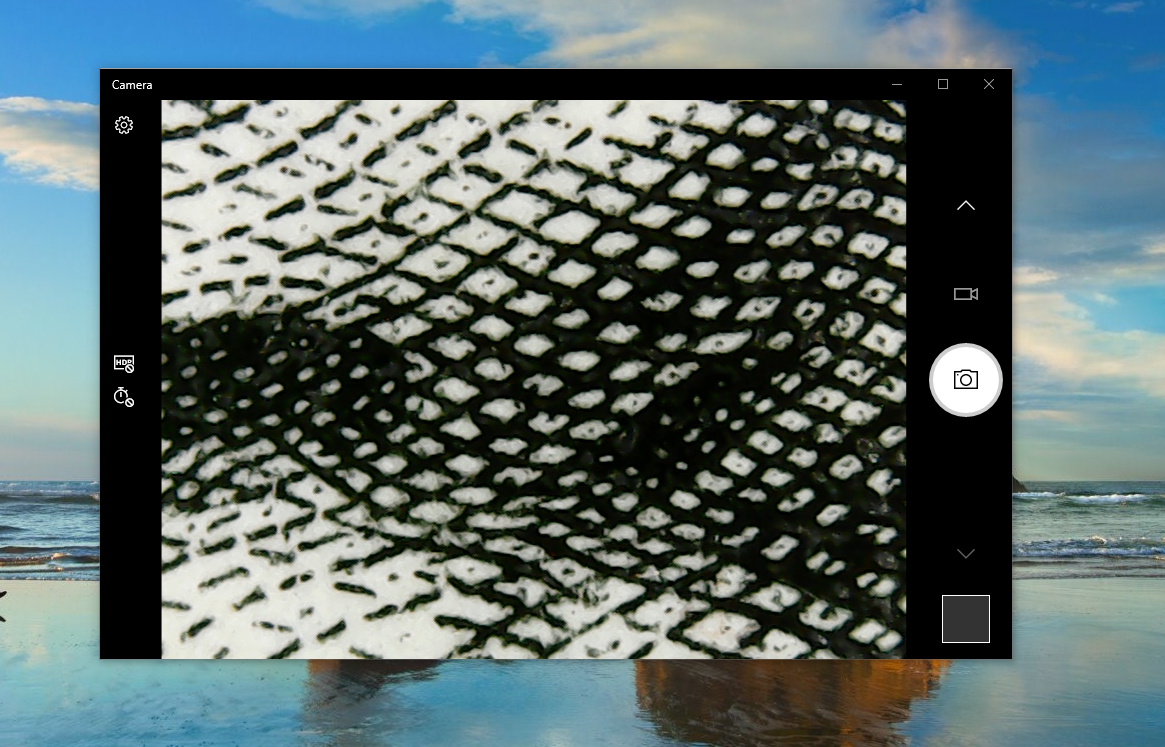
If you are a Win10 user, you can open its built-in camera app to use this microscope directly.
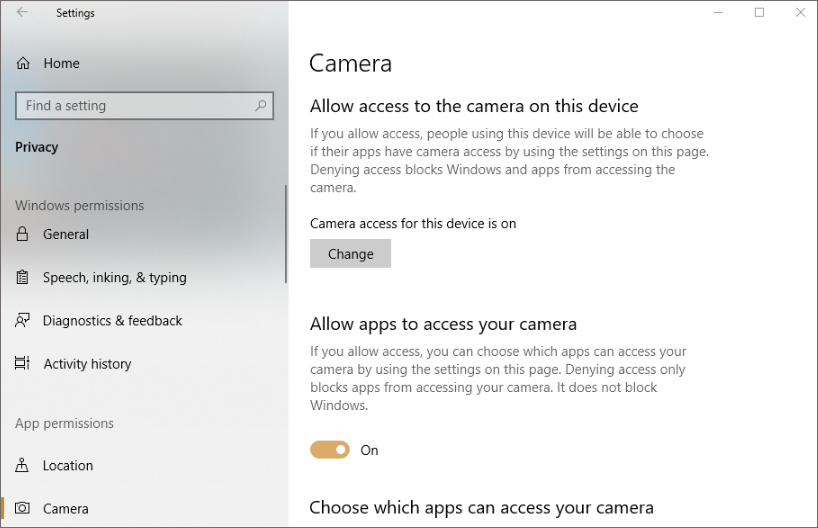
You can click the "Windows" logo on the left to find the "Camera" app.
Connect the microscope to your computer via the USB cable and then you can see the image.
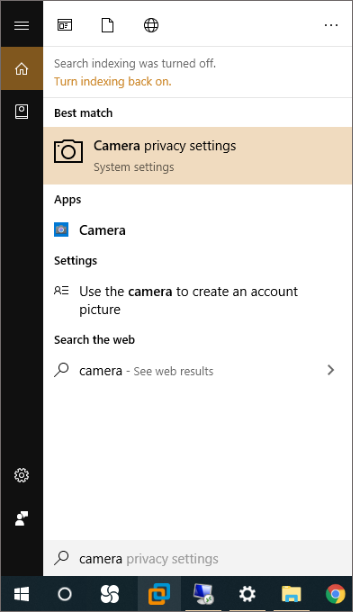
Win10 user need to set up the camera privacy setting to allow apps access your camera. Otherwise you will not be able to see any image on any camera software.
Windows xp/vista/7/8/10 user all can choose to use the "xploview" app.
Step 1: Download the "xploview"
Please download the "xploview" via the link below to install:
Download Path:xploview.exe(3.87MB) | Windows XP, Vista, 7, 8, 10 | 32/64 bit
Step 2: Install the "xploview"
Double click the "xploview.exe" and follow the steps below:
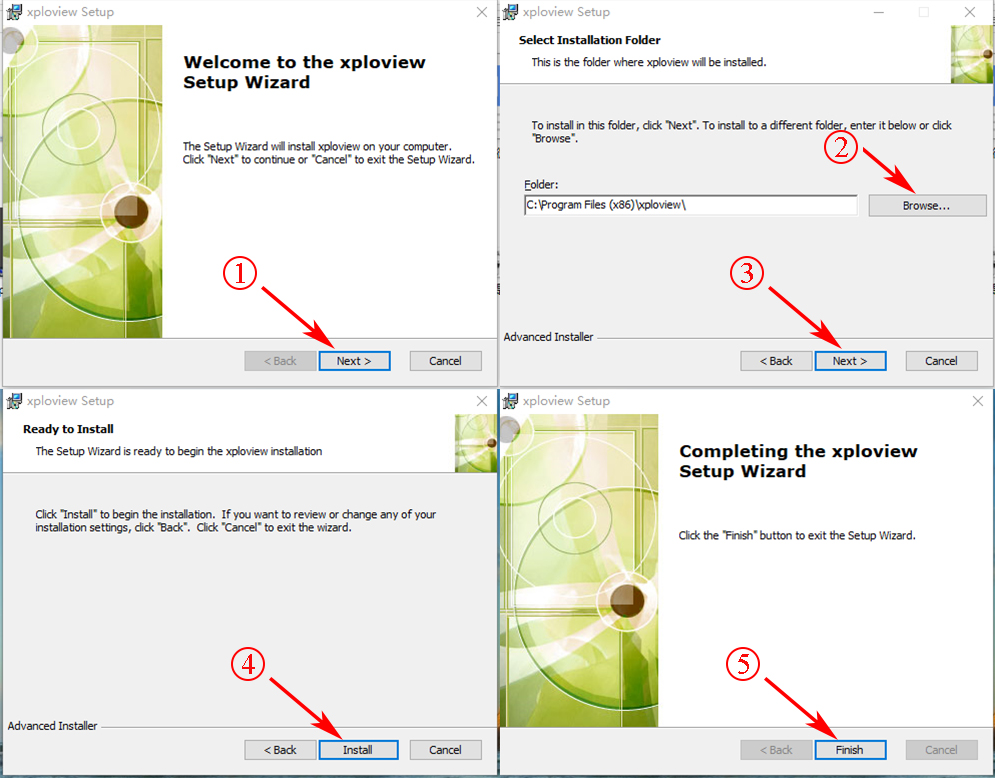
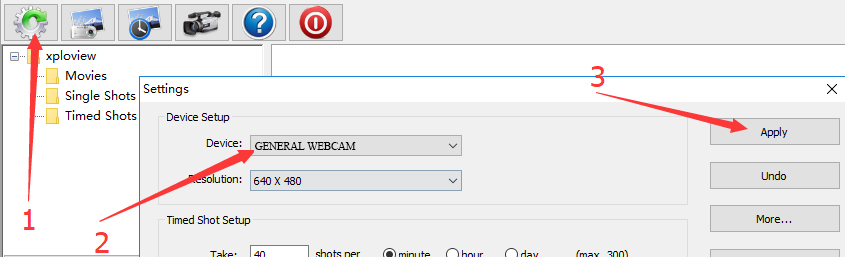
Plug the USB microscope into your computer and remove the microscope lens cover.
Run the "xploview" app and click “Settings” – “Device” to select “GENERAL WEBCAM” on the dropdown list, finally click "Apply".
Note:
Win10 user need to set up the privacy setting to allow apps access your camera. Otherwise you will not be able to see any image on any camera software.
Don't open two camera software at the same time. When the device is occupied by the first software, other software may not work properly. If it reminds you that Camera is being used by another application, please find it and close or end it. If you can find it, please restart your PC and open the software you want to used.
Common problems while using in the PC:
1) LED doesn't light up. That means your microscope doesn't connect to the PC(Maybe it's poor connnection or the usb port voltage is insufficient. Please check the USB connect or try to change another use port to connect. Don't use the USB Expansion Dock. If not the usb connect issue, please let us know.
2) LED Lights up but you fail to find the device "GENERAL WEBCAM" on the dropdown list of the camera software. Please check your camera privacy setting if you are win10 users. If it doesn't work, please contact us for help.
If you have any trouble while using your microscope, pleases contact us via our service email: cainda-seller@outlook.com
Use in Mac
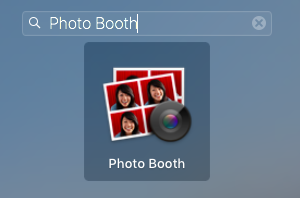
1) Photo Booth
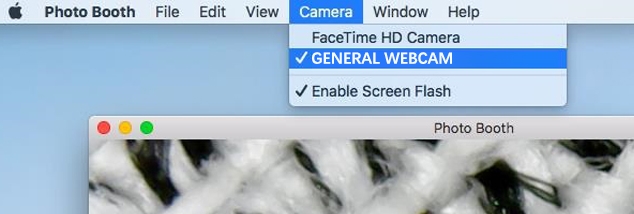
Mac user can use the "Photo Booth" to use this microscope directly.
Plug the microscope to your Mac. Click to open the "Photo Booth" software.
Click "Camera" on the top menu and select the "GENERAL WEBCAM" on the dropdown list.
2) xploview
Mac user can also use the "xploview" camera app.
Step 1: Download and install the "xploview"
Please download the "xploview" via the link below to install:
xploview_v3.3.31.pkg
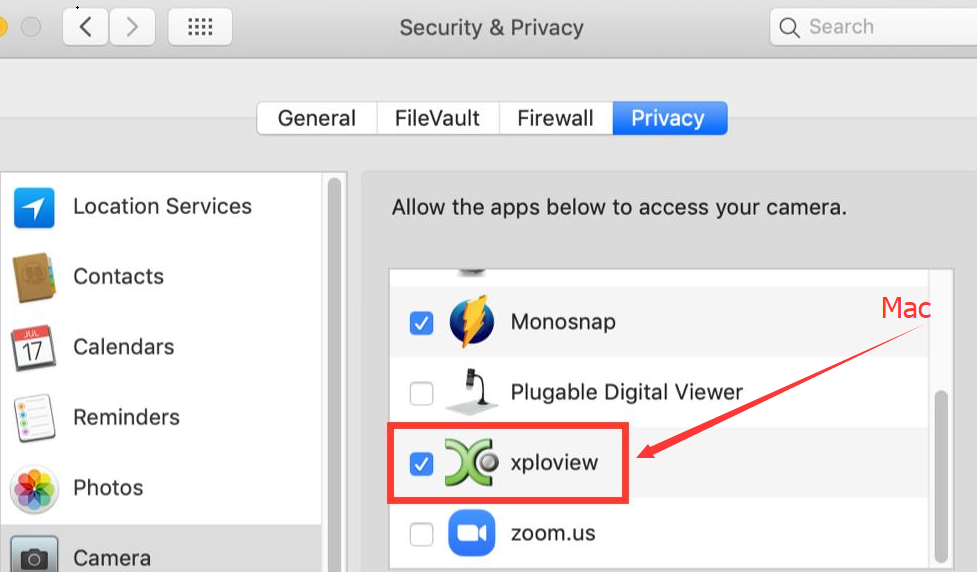
Step 2: Camera Privacy Setting
Please allow the xploview software to access your camera. Run “Security&Privacy” - Privacy” - “Camera”
Mac user can also use the "xploview" camera app.
Step 1: Download and install the "xploview"
Please download the "xploview" via the link below to install:
xploview_v3.3.31.pkg
Step 2: Camera Privacy Setting
Please allow the xploview software to access your camera. Run “Security&Privacy” - Privacy” - “Camera”
Step 3: Use your microscope
Plug the USB microscope into your computer and remove the microscope lens cover.
Run the "xploview" app and click “Setting” - “Device” to select “GENERAL - UVC” on the dropdown list, finally click "Apply".
Plug the USB microscope into your computer and remove the microscope lens cover.
Run the "xploview" app and click “Setting” - “Device” to select “GENERAL - UVC” on the dropdown list, finally click "Apply".

3) Digital Viewer
"Digital Viewer" App is compatible with a general-purpose Mac microscope.
The software is generated from Plugable Technologies company.
Please check your Mac version and choose the right one to install on your Mac:
Digital_Viewer_3.3.30.pkg(8.66MB) | macOS (10.13.4 and later) | 64 bit
Digital_Viewer_3.1.08.dmg(2.67MB) | Older macOS / OS X versions (10.5 and later) | 32 bit
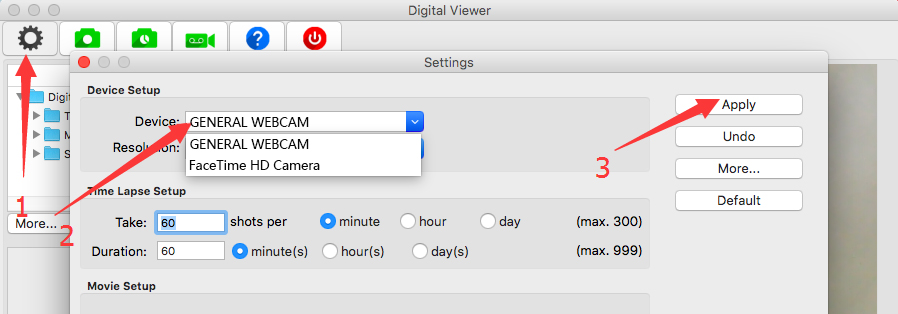
Plug the microscope into the Mac computer and run the "Digital Viewer" app.
Click “Settings” – “Device” to select “GENERAL WEBCAM” on the dropdown list.
Then click "Apply" to make the microscope work.
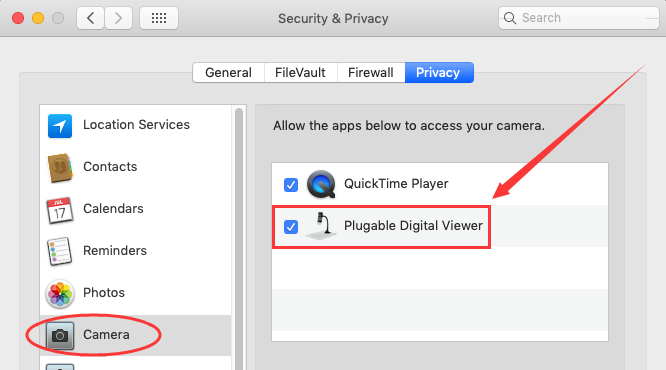
Note: Please allow the "Digital Viewer" app to access camera in "System Preferences" - "Security & Privacy"
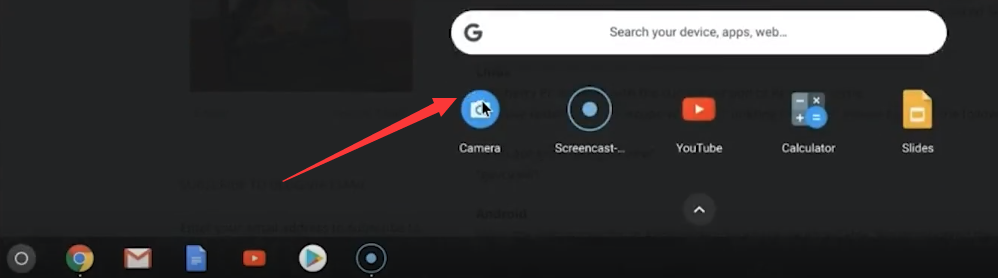
Use in Chrome OS
Cainda USB Digital microscope can be used with the default Camera app that comes with Chrome.
Go to Settings > Advanced Settings > Privacy > Content Settings > Camera, and change the device in the dropdown list to “USB Microscope”. Run the camera and your magnified object should appear on the screen.
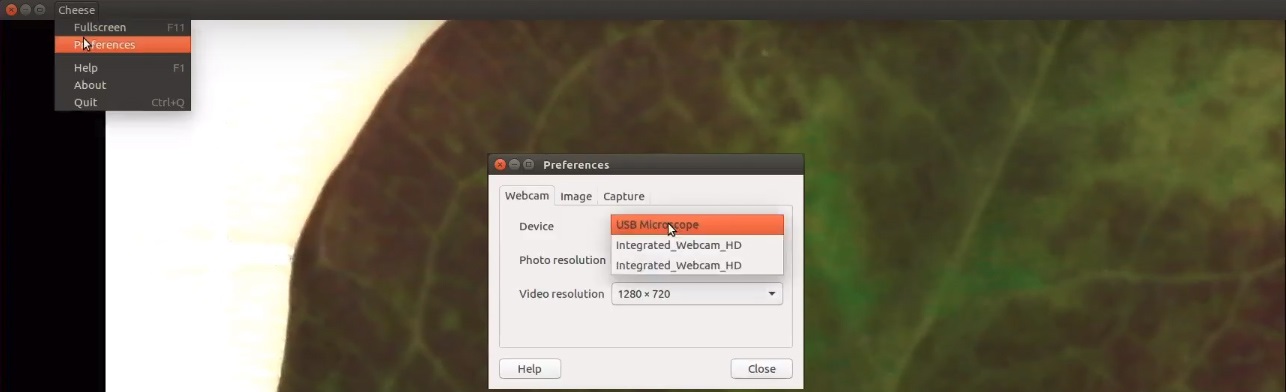
Use in Linux
On Ubuntu, search for the application "cheese" and click install. Once the installation is completed, open the application cheese. If the program displays your other camera, click on the word cheese in the top bar to access your preferences. In the webcam tab click on the dropdown menu and select USB Microscope.
Use on Android Smart Phone
Step1: Download the app
Please note that Android support is on a case-by-case basis. Phone manufacturers must have support for USB Video Class devices built in or this will not work.
You can install the 3rd party camera app like “USB Camera”, "OTG View", "AN98" as below, to use our microscope.
Download the apk file directly:
USBCAMERA.apk(4.18MB) | Android 4.4 and above
OTG View.apk(17.52MB) | Android 4.4 and above
AN98.apk(14.01.MB) | Android 4.0 and above
Google Play Download Link: “USB Camera”, "OTG View", "AN98" (NO for Android 10)
You can also install them from Google Play. If your phone system is the Android 10, please don't download the app via Google Play. It would not work due to system compatibility issues. The apk files downloaded on our website can work on Android 10. Click here to read the notice of Android 10 bug.
Note: It may report unsafe as you don't install it from Google Play. Please don't worry for it. All the apk files are downloaded from Google Play. They are just the last version. (Only the newest version doesn't support Android 10.)
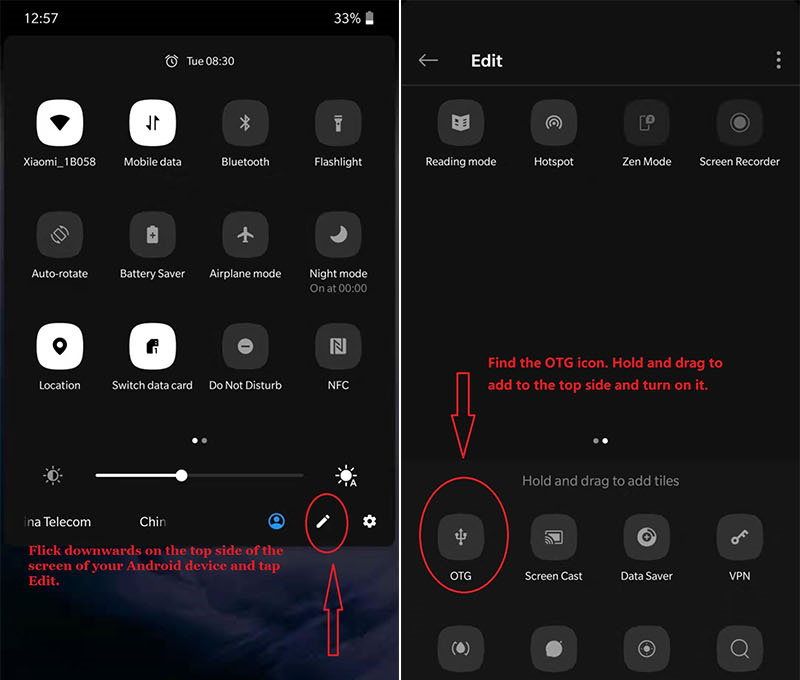
Step2: Turn on the OTG
Some phones may need to turn on the OTG manually by flicking downwards on the top side of the screen.
If you can't find this option on your phone, please skip it.
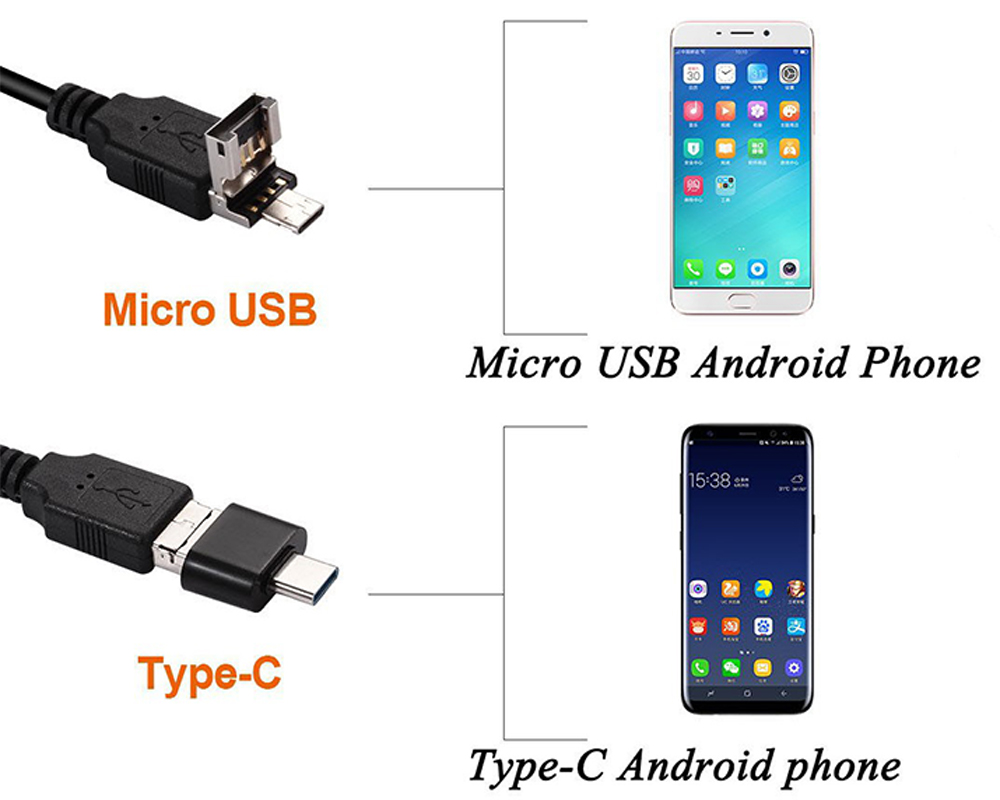
Step3: Connect with you phone to use
Micro USB phone users please flip a piece on the USB plug from the microscope and plug the micro usb to the phone.
Type C phone users please use the type C adapter to connect the microscope to the type C phone.
Then open the app (USB Camera/ OTG View/ AN98) to use your microscope.
Note:
1)If your app doesn’t display the image after you connect the microscope, please check if your phone supports OTG function. You can use the "USB OTG Checker" to check it. Or send your phone model to us cainda-seller@outlook.com.
2)If the white LED doesn't light up, please check your usb connect(Maybe the usb plug isn’t fully inserted or it's blocked by the phone case). If it’s not the connect issue, please email to cainda-seller@outlook.com to contact us. It is the micro usb or type C connect problem. We will exchange the adapter to you.
P.S.
1. If you have any problem about our microscope, please contact us via cainda-seller@outlook.com
2. If you are satisfied with our microscope, you can click here to become our registered member. We will share the impotant update about the microscope to you at the first time.
1. If you have any problem about our microscope, please contact us via cainda-seller@outlook.com
2. If you are satisfied with our microscope, you can click here to become our registered member. We will share the impotant update about the microscope to you at the first time.